Boris Astudillo, Jonathan González, Julio Mora, Cristian Bastidas, Erick Vera (2023). 3D Prototype of an Interactive Adding Machine to Improve Basic Numerical Skills. In: Human Interaction & Emerging Technologies (IHIET 2023): Artificial Intelligence & Future Applications. AHFE Open Access, vol. 111, pp. 139–149. https://doi.org/10.54941/ahfe1004018
3D printing in industries like medicine and education has led to major improvements in designing, developing, and printing useful models, including body prostheses and educational toys. The 3D printer's commercialization has risen thanks to more manufacturers, models, and reasonably priced equipment. As a result, prototypes and gadget creation have merged cutting-edge design techniques like gamification and electronic components, allowing accessibility and interactive and enjoyable devices. This paper describes the design, production, implementation, operation, codification, and printing of a 3D prototype of an interactive adding machine to improve basic numerical skills and help children and others with cognitive disabilities learn easier or lessen distractions. The prototype and all the necessary documentation are available for anyone to replicate. The paper also discusses difficulties encountered during the design process and proposes future improvements for the next version.
Education has been significantly impacted by 3D printing, which has incre- ased student interest and encouraged class engagement and involvement (Sicnova, 2020). In addition, 3D printers demand has increased in recent years; according to (Impresiondigital, 2021), it is asserted that this techno- logy will grow exponentially in the coming years, only in 2019, this industry generated 11,850 million dollars.
Another valuable educational component is gamification, which includes different techniques that serve as alternatives to the typical strategies emplo- yed in educational systems. The incentive towards learning and fun in the educational context are two benefits of adopting these strategies and gaming features (Gil-Quitana & Prieto, 2020).
The idea of this project arises from the integration of these branches, 3D printing and gamification, since this paper details the construction process of
an adding machine, which allows children to learn, in a didactic and recreati- onal way, this concept of elementary mathematics. However, the applicability of this device can be extended to other beneficiaries, such as people with neurodegenerative diseases, to recover and strengthen their cognitive abilities.
The paper starts with an Introduction detailing the project’s evolution in perspective; Related works, where we analyse some similar prototypes; Meth- odology and tools, which include information on the design, modelling, and 3D printing processes as well as the electronic circuit used to operate the adding machine; the Prototype implementation has instructions about how to assemble all the components until obtaining the final product; Future impro- vements explain ideas on how to improve the prototype; finally, there are the Conclusions on what has been developed. It should be noted that the adding machine replication procedure is described in further detail in a manual that can be accessed from the Resources section.
RELATED WORKS The number of research related to 3D printing and education is high; how- ever, below, reference is made to some with a greater affinity with what is developed in this paper.
Information Technologies constitute important resources for constructing new learning strategies and methodologies that satisfy students’ needs. Under this premise (Arrivillaga et al., 2022), described how 3D printing might be used to produce human body replicas for educational purposes in anatomy classes.
Besides contributing to the educational field, 3D printing can also benefit people’s health; according to (Heinze et al., 2020), this technology is utili- zed in medical education to plan procedures and create prosthetics or tissue grafts for patients. 3D printing generates different research areas, generating expectations about a promising future where this technology could play a key role in obtaining a solution.
However, the applicability of 3D printing can also be extended to other areas, outside of medicine, according to (Macdonald et al., 2014), detailing the use of this technology as an improvement in the generation of electro- nic products since it is achieved precisely aspects such as the placement of components or electrical interconnections, in this way this industry can be revolutionized by reducing manufacturing times by offering advanced electronic prototypes.
METHODOLOGY AND TOOLS 3D Modeling
During the prototype construction, 3D modelling techniques were used in the Blender software version 3.5.1, and the printing process was carried out in the FlashForge Guider IIs 3D printer using Flashprint software version 10.11.1. To carry out the modelling, we applied the prototyping model, a systems development method to build prototypes of an application or software until
3D Prototype of an Interactive Adding Machine to Improve Basic Numerical Skills 141
achieving a final version; the prototype seeks to satisfy customer require- ments, improve usability, and explore design options before a final version (Armenta-Benitez et al., 2018).
This model includes requirements analysis based on objectives, then pro- poses a rapid prototype design to proceed to its construction, user prototype evaluation later and make refinements. Finally, deliver the final product; this cycle is represented in Figure 1.
Prototyping is an iterative process that involves constant evaluation and continuous improvement. Using gamification techniques as a learning model based on problem-solving with human-machine interaction and incorpora- ting playful elements are key strategies to improve the user experience in the prototyping process. However, to ensure efficiency and user satisfaction, it is essential to have an iterator model that constantly evaluates and refines the prototype’s requirements and functionalities; this will ensure that the final product is delivered and satisfies the user’s expectations (Area & González, 2015). Gamification and learning combine to improve learning through play; Toys and video games promote coherence, integration, and enthusiasm for the subject matter are examples (Marín, 2015), inspiring students’ interest and inventiveness in the learning process (Ortiz-Colón, 2018).
Control Circuit Design Using the free Fritzing software for schematic design and prototyping, the circuit design includes the stages of electronic component specification and circuit design, prototyping, coding, construction, and testing of the device. The program code that regulates the hardware was written and compiled using the Arduino integrated development environment. The specified com- ponents and a prototype board (breadboard) were utilised for prototyping.
Figure 1: Prototyping model cycle.
PROTOTYPE IMPLEMENTATION Design, Modelling, and 3D Printing
1. Requirements analysis based on objectives. The requirements and characteristics of the adder prototype to be met are:
Fun and entertaining to keep users interested.
Visually appealing and familiar for users to enjoy the game experience with an already known object.
User-friendly, preventing confusion or frustration.
Clearly stated mechanics that help the user understand what must be done to succeed in the game.
Provide positive and negative feedback visually and audibly so the user is aware of how many games were won or lost.
2. Rapid Design During this phase, the prototype’s form and operating mechanism were established.
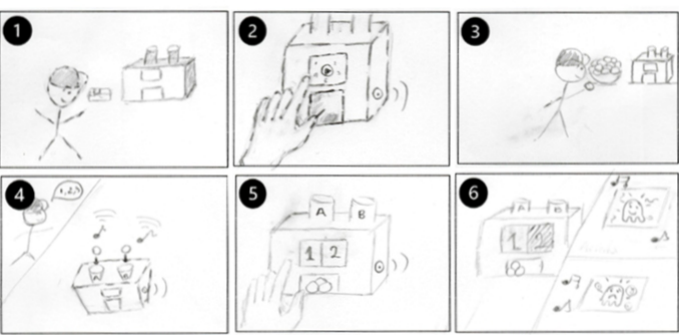
So, preliminary sketches were produced on a storyboard detailing the use process in six steps; Figure 2 displays the mentioned storyboard sketches.
In Sketch 1, the user recognizes the prototype’s shape and associates it with already-known figures, objects, and toys.
Then, in Sketch 2, the user turns on the prototype and may confirm its functionality through the screen and sounds produced.
Immediately, in Sketch 3, the user starts interacting with the balls that must insert into the two upper cylinders of the prototype.
Next, in Sketch 4, the prototype gives audible feedback after inserting each ball. Simultaneously, the prototype counts and sum the balls inserted, displaying both the correct and incorrect results.
Next, in Sketch 5, the prototype presents the final sums, and the user can select the right or wrong response depending on their understanding of basic math operations.
Finally, in Sketch 6, the prototype offers visual and audible feedback, and according to the selection, positive or negative feedback is generated. 3. Prototype Construction This phase provides guidelines and ideas for 3D modelling in the Blender software; from this, the dimensions, shapes, and details were considered, for which multiple model versions were created and tried to print in one piece; latterly, it was decided to design modular pieces that fit together, which significantly reduced the printing time and risk of failure.
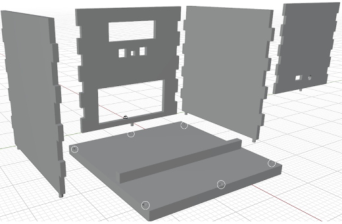
For this, it was essential to employ gamification techniques, such as the use of notches on the side faces of the cube that permit the assembly of the
3D Prototype of an Interactive Adding Machine to Improve Basic Numerical Skills 143
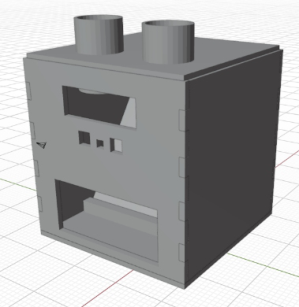
prototype as a puzzle; also, the base is coupled with the side faces via notches; moreover, the front side has slots designed to install the screen and the but- tons that allow starting the game and selecting the answers and there is a rectangular slot where the balls come out. On the other hand, the rear side has one hole to supply power and the other to adjust the screen brightness (Figure 3).
Figure 3: Illustration of notches on each cube face, front and rear side.
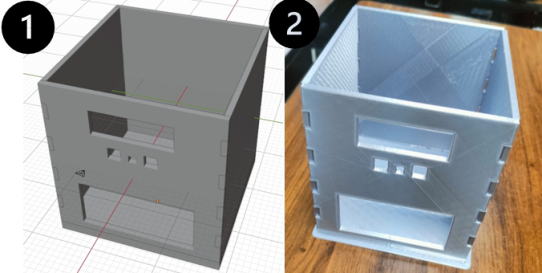
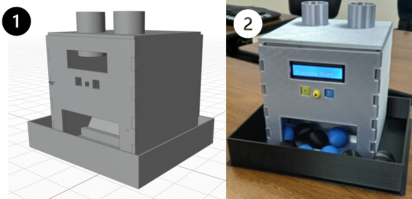
Figure 4 shows the assembling of each prototype side, software assembled model (1) and the physically assembled model (2).
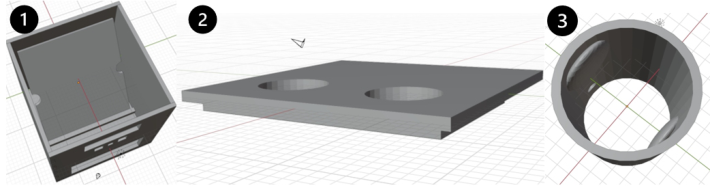
Figure 5 (1) illustrates the prototype base with a wedge that supports the ramp placed diagonally, protecting the main circuit. The two side holes allow the passage of the cables coming from the screen and the sensors located in the cylinders through which balls fall. Also, the prototype’s lid includes two holes designed to fit the cylinders, Figure 5 (2 and 3), and each one has two holes for the installation of the sensors and protrusions designed for the balls to fall slower, facilitating the balls counting by the sensors, Figure 7 (2).
Figure 4: Software assembled model (1) and the physically assembled model (2).
Before the 3D printing, the design software assembled all the pieces to ensure that all fit properly and that the prototype had an optimal appearance (Figure 6).
The extruder and the printing platform temperatures were configured according to the filament’s specifications as part of the printing process; as
Figure 5: Wedge and the two side holes (1), Prototype’s lid (2) and cylinders (3).Figure 6: Final prototype’s software assembly.
well as, the scale, orientation, bases, supports, and temperatures were also configured in the printing software. 4. User Prototype Evaluation Ten children between the ages of 5 and 7 evaluated the prototype in a con- trolled environment during this phase. Before the examination, the children were given an explanation and a demonstration of prototype use.
During the test, the children utilised the prototype to perform elemen- tary sums while evaluating its usability, instruction clarity, and entertainment level. The Table 1 survey evaluated each child’s adding machine’s design perception, usability, and learning utility.
Ninety-five per cent of children found the prototype easy to use and enter- taining, eighty per cent found it useful for learning addition, and thirty per cent disagreed with the design when displaying interaction results. Also, a platform surrounding the prototype was suggested to enhance the game’s fluidity. The evaluation of the prototype effectively demonstrated its efficacy in mathematics instruction. 5. Prototype Refinement In this phase, the suggestions and observations were considered; therefore, the rapid design phase was returned to redevelop a design and the respective construction of the suggested platform (Figure 7-1).
3D Prototype of an Interactive Adding Machine to Improve Basic Numerical Skills 145
Table 1. User survey.
Table available in the original PDF paper.
Categories Questions Utility Would the adding machine help you learn math? Would you recommend this adding machine as a toy? Ease of use Was it easy to use the adding machine? Was it easy to choose the answer with the buttons? Was it easy to add balls using the adding machine? Was there any difficulty using the adding machine? Design Did you like the buttons to play with the adding machine? Was it easy to read the information that appeared on the screen?
Figure 7: Prototype redesign (1) and final prototype (2).
6. Final Product Finally, all the modular pieces are combined to form the complete model. In addition, resistance tests are carried out to ensure the final model meets the required quality standards (Figure 7-2).
Circuit Implementation For the circuit construction that provides the adder’s functionality, we follow the next steps: 1. Electronic Components Specification and Circuit Design The circuit is composed of several electronic components, which allow the operation of the device described in Table 2.
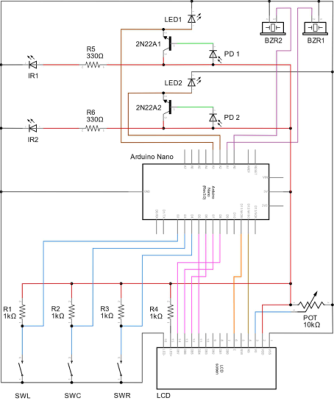
The device’s central processing unit is an Arduino Nano microcontroller, which oversees the counting process and displays the results on a 16x2 chara- cter LCD. This microcontroller is responsible for receiving signals transmitted by photodiodes, processing the data, and transmitting the resulting data to the LCD and buzzers.
The two photodiodes (PD1 and PD2) detect the passage of the 3D balls and are in constant communication with the two infrared LEDs (IR1 and IR2). When communication is interrupted, the photodiodes send a trigger signal to the 2N22A transistors (2N22A1 and 2N22A2). The Arduino recei- ves this activation signal from the transistors, interprets it, and performs the corresponding count.
The BZR1 and BZR2 buzzers provide audible feedback and play disti- nct noises based on the user’s performance. Additionally, the infrared LEDs and calibration feedback LEDs (LED1 and LED2) are connected to the
Table 2. Electronic components used in the prototype.
LCD Provide information and feedback to the user Transistors (2) NPN 2N22A 2N22A Send activation signals from the photodiodes Photodiodes (2) 5mm PD Maintain communication with infrared LEDs Infrared Led (1) 5mm IR Communication with the photodiodes Buzzers (2) 5v 23kHz 12mm Active
User interaction
BZR Provide audible feedback to the use LEDs (2) 3mm LED Photodiode calibration feedback Button (1) 6mm x 6mm SWC User interaction Buttons (2) 12mm x 12mm SWL, SWR Resistances (2) 330 ohms R5, R6 Limit the current of the infrared LEDs Resistances (4) 1k ohm R1, R2, R3, R4
Limit the current of pushbuttons and LCD Potentiometer 10 k ohm POT Calibrate LCD contrast Stripboard - - Circuit assembles
transistors that transmit the trigger signal to the Arduino, allowing for the synchronisation of all circuit components.
On the other hand, the circuit also includes three user-interactive switches connected to Arduino and used to initiate the game (SWC) and select the correct sum result (SWL and SWR).
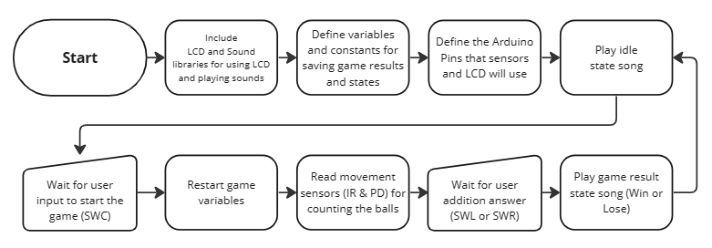
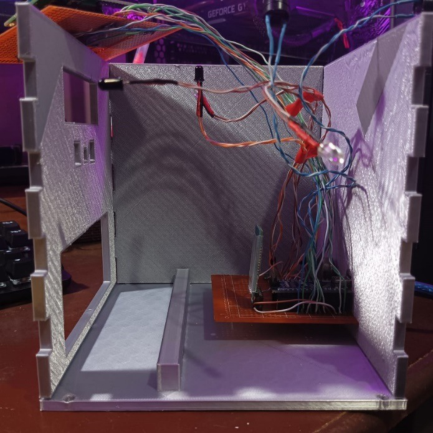
Finally, the circuit includes various resistors that regulate the intensity of the current travelling through the electronic components of the device. These resistors are employed for the infrared LEDs (R5 and R6), press but- tons (R1, R2, and R3), and LCD backlight (R4). In addition, a 10-kiloohm potentiometer (POT) is included so that the contrast of the LCD can be cali- brated. Figure 8 is a circuit diagram of the procedure, including the electrical component abbreviations. 2. Circuit prototyping Once the circuit diagram is designed, the prototype is transferred to a breadboard, in which the components are interconnected (Figure 8). 3. Codification For coding was considered the programming logic is shown in Figure 9. 4. Construction After the prototype and code are functional, we construct the final hardw- are. In this situation, the components are welded to convert the breadbo- ard into a stripboard. The final circuit board is divided into two sections (Figure 10): one containing controls and a LCD, and the other containing an Arduino and other components that assist in positioning the screen for human interaction.
3D Prototype of an Interactive Adding Machine to Improve Basic Numerical Skills 147
Figure 8: Circuit diagram and circuit prototyping.Figure 9: Flow chart for coding.
5. Testing For this step, it was verified that there were no short circuits and that all the components were correctly connected following the scheme (Figure 8).
Then, the device was turned on, verifying that the LCD correctly showed the startup message.
Next, a ball was inserted into the device to verify that the circuit detects the interruption of the infrared LEDs and performs the corresponding count, ensuring that the ball detection system is working properly.
Next, the buzzers were verified to reproduce the appropriate sounds based on the user’s result. This is important because it allows the user to receive auditory feedback on their performance.
After that, the buttons were used to select the correct response and ensure the device responded appropriately. In this way, it is ensured that the user’s interaction with the artefact is carried out effectively.
Figure 10: Circuit construction is separated into Section 1 (user interaction) and Section 2 (Arduino Nano and remaining components).
Finally, testing with different ball combinations and checking that the circuit works correctly under various conditions allows for its successful ope- ration and achieves the design goals. This feedback helps identify potential issues or areas where the artefact might be improved.
FUTURE IMPROVEMENTS Based on the results of the usability evaluations, the following suggestions for future improvement are provided:
The addition of a second circuit would regulate all aspects of the game. Since there is no background music when counting the balls and choosing the correct answer with the model as it is provided, due the Arduino only allows the execution of one task at a time.
Another area that needs improvement is how the result is presented; so, the circuit must be more thoroughly programmed to reflect the intended displays as users can implement appealing illustrations.
The printing of an additional module could be developed to organize better the filament that allows the operation of the adding machine.
Alternatively, the outcomes could be displayed and interacted with via a Bluetooth-enabled mobile application that connects the circuit to the smartphone, innovating and providing users with stunning displays.
Include additional mathematical operations of integer numbers.
CONCLUSION
3D printing is a technology that has ventured into different industries, inclu- ding manufacturing, education, and medicine; it has become the focus of numerous research studies to develop tools that would make it easier to solve challenges.
3D Prototype of an Interactive Adding Machine to Improve Basic Numerical Skills 149
Regarding education, 3D technology offers several possibilities that can lead to engaging and useful solutions when combined with strategies like gamification and electronic technology.
RESOURCES In this link, the readers will find the files, programming codes and the assembly manual. (https://drive.google.com/drive/folders/1ERmq7Ebv-p4A VqjiqVeZz-Ci3mJcdu5E?usp=share_link).
ACKNOWLEDGMENT
The authors are grateful for the support provided by the Tecnologías y Sistemas de Información Aplicados (SITECIA) research group code GI- Quito-071-2022, Pontificia Universidad Católica del Ecuador and Sistemas de Información e Inclusión Digital (LUDOLAB) research laboratory, Escuela Politécnica Nacional.
REFERENCES
Area, M. & González, S. (2015). De la enseñanza con libros de texto al aprendizaje en espacios online gamificados. Educatio Siglo XXI, 33(3), pp. 15–38. Armenta-Benitez, B., Rodriguez-Espinoza, I., Medina-Muñoz, L. & Gonzalez-
López, S. (2018). Aplicación del modelo de prototipos: Caso de estudio Software RedbotGamesShop. Revista de Simulación Computacional, 2(5), pp. 8–13. Arrivillaga, C., Peña, L., & Pacheco, N. (2022). Uso problemático de redes sociales e inteligencia emocional en adolescentes: análisis de las diferencias por género. European Journal of Education and Psychology, 15(1), pp. 6. Gil-Quintana, J., & Prieto Jurado, E. (2020). La realidad de la gamificación en edu-
cación primaria. Perfiles Educativos, 42(168), pp. 107-123. https://doi.org/10. 22201/iisue.24486167e.2020.168.59173 Heinze, A., Basualto-Martinez, M. & Suárez-Ibarrola, R. (2020). Impresión 3D y sus beneficios en el campo de la educación médica, entrenamiento y asesoría del paciente. Revista Española de Educación Médica, 1(1), pp. 1–8. https://doi.org/ 10.6018/edumed.421221. Impresiondigital (2021). El mercado de impresión 3D crecerá un 14% anual
hasta 2027. Retrieved from https://impresiondigital.ituser.es/noticias-y-actualidad /2021/06/el-mercado-de-impresion-3d-crecera-un-14-anual-hasta-2027 Macdonald, E., Salas, R., Espalin, D., Perez, M., Aguilera, E., Muse, D. & Wicker, B. (2014). 3D printing for the rapid prototyping of structural electronics. IEEE Access, 2, pp. 234–242. Marín, V. (2015). La gamificación educativa. Una alternativa para la enseñanza
creativa. Online. Retrieved from https://revistes.ub.edu/index.php/der/article/view /13433/pdf Ortiz-Colón, A., Jordán, J., & Agredal M. (2018). Gamificación en educación: una panorámica sobre el estado de la cuestión. Educação e Pesquisa, 44. https://doi.or g/10.1590/S1678-4634201844173773 Sicnova (2020). 3D printing in education: Advantages and How to implement
it. Online. Retrieved from https://sicnova3d.com/blog/la-impresion-3d-en-la- educacion/
Read this individual research paper free through the original publisher, or explore the full digital proceedings book.
ISBN 978-1-958651-87-2
Explore this ISBN in the AHFE Bookstore ↗Listed in the July 2026 bookstore catalogue; search by ISBN to confirm current availability · Digital book purchase optional